Role Based Access Control
If you’ve worked as a Systems Administrator for any length of time, you’ve had a few (if not all) of the following queries come across your desk:
- Provide a list of everything that Joe can access
- Who has access to delete items in all the meeting room calendars?
- We have a new starter, please give her all the same permissions as Joe
- Who can edit files in the Marketing folder?
As a young (and admittedly naive) systems administrator, I thought I was doing the right thing by assigning folder access by departmental group. Certainly it was a lot better than assigning folder access by individual user, but as far as answering the first two questions, it was of no use.
Thankfully my first system administrator roles were for fairly small companies, so I could provide answers for questions 1 and 2 after a few hours spent clicking and noting down permissions and rights. After enduring a few audits of access permissions, I resolved to find a better method of addressing these queries.
Enter Role Based Access Control (RBAC)!
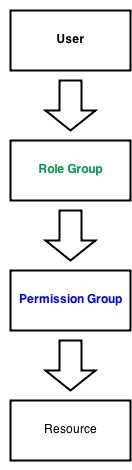
The basic premise behind RBAC is as follows:
- Users are added to Role groups
- Role groups are added to Permission groups
- Permission groups are given access to resources
Role Groups
Role groups represent a list of permissions and/or access rights that can be assigned to a specific user. Usually these tie in to a job role or a task that the user performs.
Role groups contain only user accounts or other Role groups.
Permission Groups
A Permission group is assigned access to a single resource and access level. If a resource can have multiple access levels assigned to it, then separate Permission groups will need to be assigned to each level.
For example, a single file share could be accessed in Read-Only or in Read/Write mode. In this situation, two Permission groups would be used.
Permission groups contain only Role groups and special user accounts.
I would discourage adding regular interactive users directly into Permission groups. If they only require access to a single resource, I would create a new Role group and add the user to the Role group and the Role group to the Permission group. This allows for consistency in the assigning of Roles and Permissions, and allows for greater flexibility in the future, if further permissions are required for that Role.
For non-interactive user accounts (eg. Service Accounts), I would have no issue adding them directly to the Permissions groups. These user accounts typically need very specific and restricted permissions, and so the additional overhead of a Role layer is unneeded.
Naming Standards and Description
A consistent standard for naming groups is essential for quickly seeing what Roles are assigned to users and what Permissions are assigned to Roles. It’s also crucially important to have an accurate human-readable description filled in for each of the groups, which can also be used to provide additional information.
The actual naming convention is a matter of personal preference. I try to keep the group names short and descriptive, to make quick ad-hoc lookups from the the AD console easier. With a set of scripts and an appropriate front-end though, this may be unnecessary. Old habits die hard though!
Scripting
What really makes RBAC so powerful is providing reporting by means of scripting. Some examples of what can be achieved easily are:
- Take an existing Permission group and output the list of Roles and/or users which have that permission.
- Show all permissions assigned to a Role or user account. This can output the Description field instead of the Permission group name, to use in reports.
- Copy all Role groups from one user to another, to allow a new user to be given the same access rights and permissions as an existing user.
Example
Assume we are presented with the following requirements:
- A 1st line support group, which needs access to reset passwords and manage printers.
- A 2nd line support group, which needs the same access as 1st line, as well as local administrator rights on all workstations.
- A Marketing group, which has modify permissions on the Marketing share.
- A Sales group, which has read-only permissions to the Marketing share.
My personal naming convention for Role and Permission groups is as follows:
- Each group name has 3 parts, separated by dashes.
- Part 1 is a single letter, indicating the type of group.
- Part 2 is a keyword allowing grouping of related groups. For Role groups, this may be the department name, for Permission groups it may indicate the service or area that permissions will be applied.
- Part 3 is either:
- A short description of the role
- A two-part field with a short description of what the permission applies to and the level of permission applied, separated by an underscore.
The above naming convention should allow for a short group name, containing all the relevant information in the name, without having to refer to the Description field.
For the example, the first things we’ll create are the Role groups:
- R-IT-1st Line Support
- R-IT-2nd Line Support
- R-Marketing-Users
- R-Sales-Users
Next we’ll need to create the Permission groups:
- Permission to reset AD passwords: P-AD-User Passwords_Reset. This tells me that it’s a Permission group, it applies to Active Directory permissions, it involves permissions to User Passwords, and the level of access is Reset.
- Permission to manage printers: P-Printers-PRINTSERVER01_Manage. This group is a little longer, but it tells me that it relates to Printers, on the PRINTSERVER01 server, and the permission is Manage.
- Local Administrator permission on workstations: P-Workstations-All_Admin. This shows that the group applies to Workstations, applies to All workstations (as opposed to just one geographic region) and applies the Admin permission.
- Modify/Edit permission to the Marketing share: P-Share-FILESERVER01 Marketing_Edit. The group indicates that it refers to share permissions, on the FILESERVER01 server, Marketing share, and it grants edit rights.
- Read-Only permission to the Marketing share: P-Share-FILESERVER01 Marketing_Read. As above, this shows that it provides Read-Only permissions to the same share.
Now we can assign the relevant permissions/rights to the Permission groups:
- Using the Delegate Control wizard, choose the P-AD-User Passwords_Reset group, and delegate just the permission to reset passwords.
- On the PRINTSERVER01 server, add the P-Printers-PRINTSERVER01_Manage group to the local Print Operators group.
- Using a GPO linked to the workstation OU, add the P-Workstations-All_Admin to the built-in Administrators group. Or add this as a step in the workstation build process.
- On the FILESERVER01 server, adjust the permissions on the Marketing share. Assign the P-Share-FILESERVER01 Marketing_Edit group modify permissions, and the P-Share-FILESERVER01 Marketing_Read group only read permissions.
Linking the Role and Permission groups can be done in a number of ways. This is my preference:
- Add R-IT-1st Line Support to P-AD-User Passwords_Reset and P-Printers-PRINTSERVER01_Manage.
- Add R-IT-2nd Line Support to P-Workstations-All_Admin.
- Add R-Marketing-Users to P-Share-FILESERVER01 Marketing_Edit.
- Add R-Sales-Users to P-Share-FILESERVER01 Marketing_Read.
Any users in the 1st Line Team would be added to R-IT-1st Line Support. Users in the 2nd Line Team would be added to both R-IT-1st Line Support and R-IT-2nd Line Support (ie. they would be assigned both roles).
Another option would be to add R-IT-2nd Line Support to R-IT-1st Line Support and then add users to only one of the groups. Any users in the 2nd Line group would then inherit the 1st Line permissions. I prefer to avoid nesting of groups, as a quick glance at the user page in AD does not show which roles are assigned to a user without opening each of the role groups and checking nesting. I prefer to have all the information available on the user’s Member Of tab if possible.
Special Permission Groups
Any systems that are not connected to the network (eg. a device to create/assign access cards) or applications that are not able to deal with nested AD groups, or indeed not able to authenticate to AD at all, can be handled via Special groups.
These are dummy Permission groups, set up the same way as regular Permission groups, but simply not assigned permission to the resource. Rather the Description field indicates what it applies to and possibly a link to the documentation for the device/system/software. This allows us to track all of the user’s permissions, for the purposes of giving another user the same rights, or removing access when the user leaves.
Conclusion
With the addition of some extra groups and a different way of thinking, it becomes trivial to map users to permissions and vice versa. This simplifies a number of system administrator tasks, with only minimal setup burden.
The RBAC system can quite easily be extended further, for example, tying software installations to roles as well.
This is a good Technet video outlining some of the same concepts.
Leave a Reply